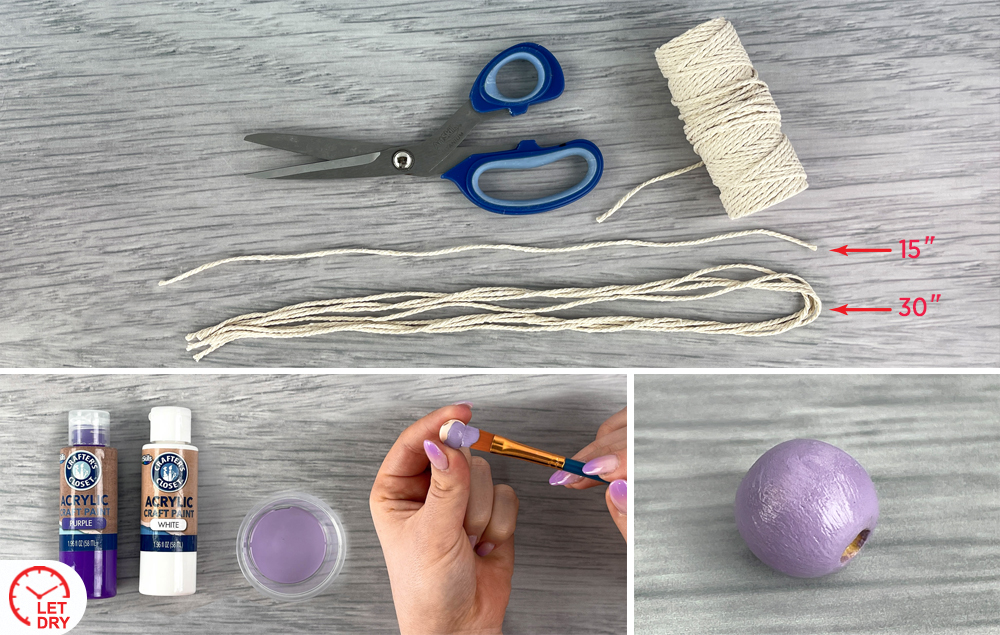
A) Cut one 15" length and four 30" lengths of craft cord.
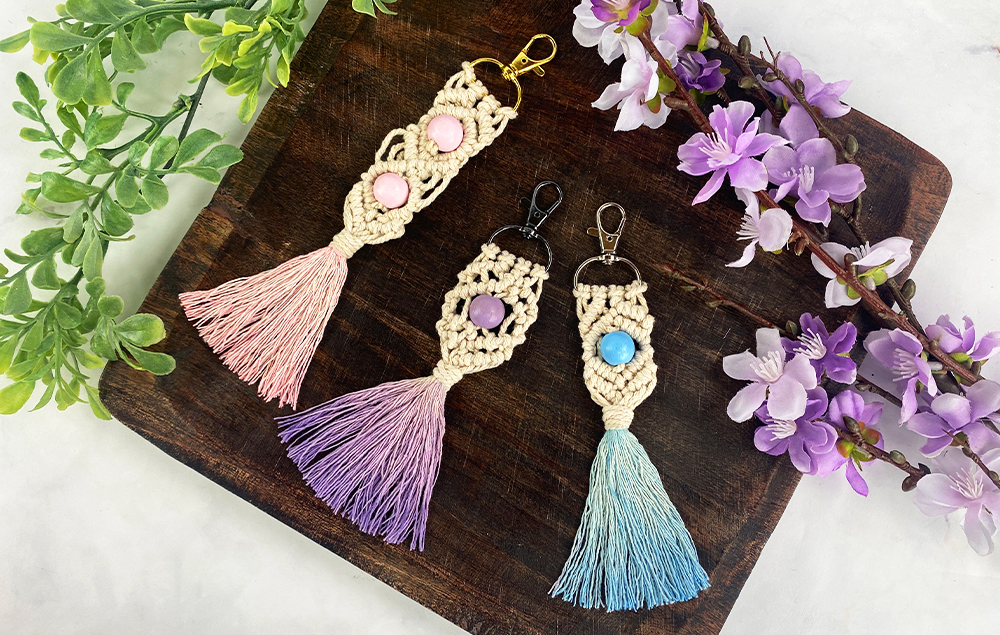
B) Mix a lavender paint color and paint a smaller wood bead. Let dry.
STEP 2:
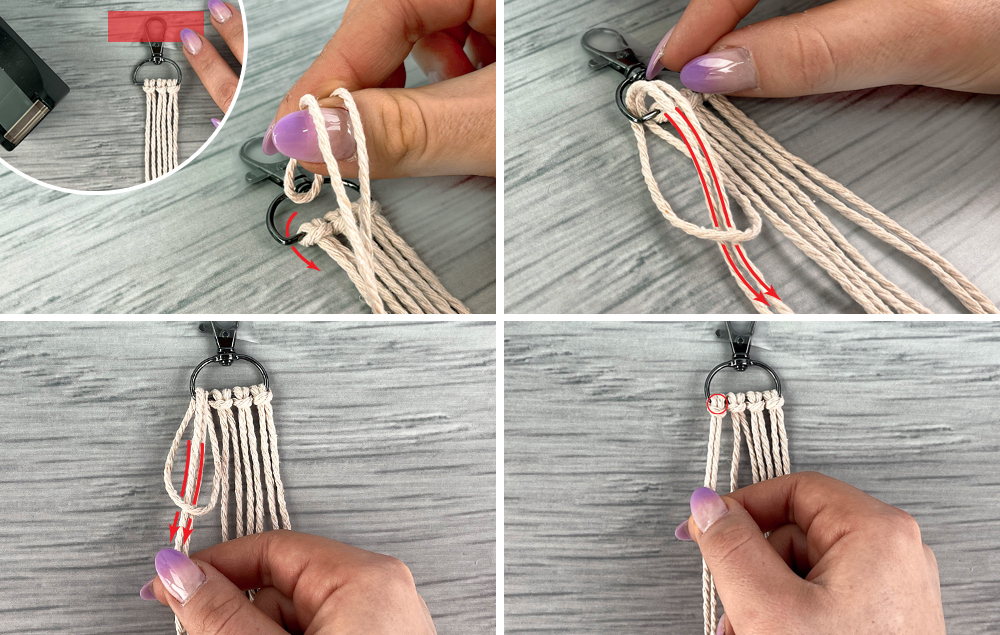
A) Create a lark’s head knot by folding one 30" length of craft cord in half and feeding the looped end through the D-ring keychain from the front. Tip: Tape the D-ring keychain to your surface to keep it in place while you’re working.
B) Tuck the two ends of the craft cord through the loop.
C) Pull the two craft cord ends tight to slide the knot up towards the D-ring keychain.
D) Tighten the knot at the top. Repeat to make four lark’s head knots.
STEP 3:
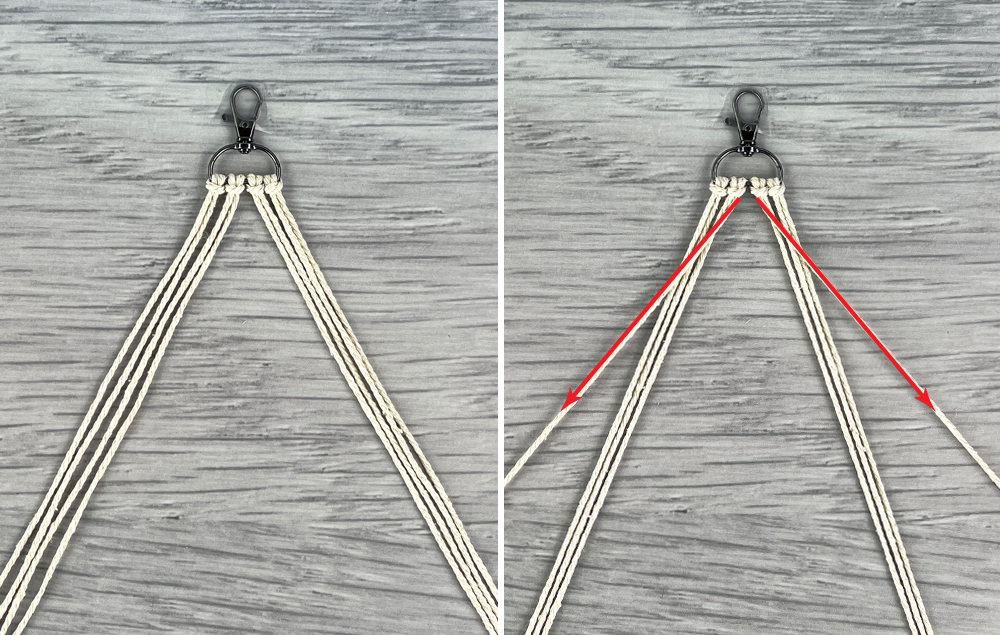
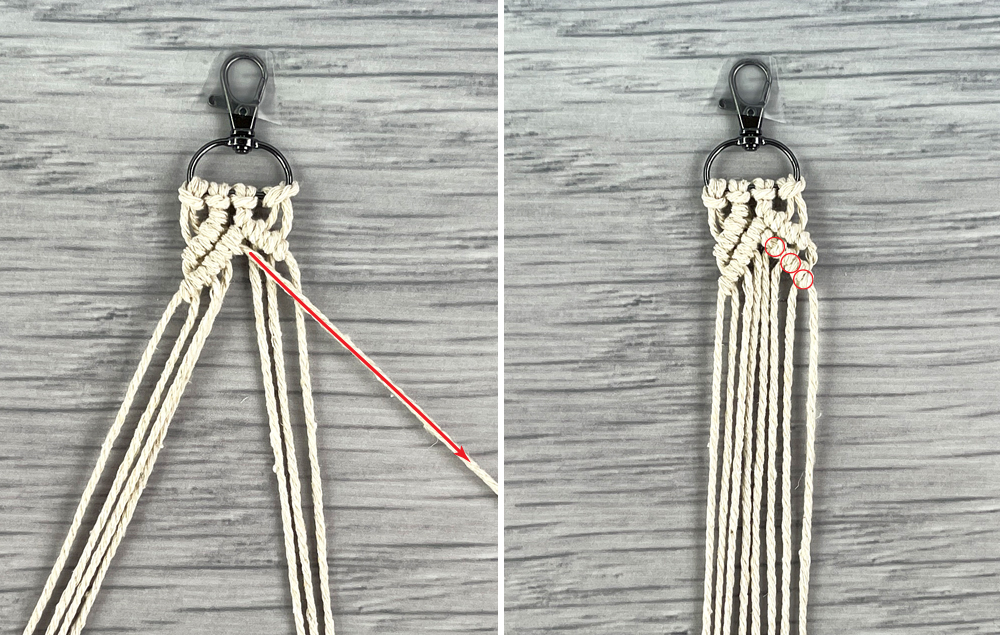
A) Separate the craft cords evenly on the left and right side.You should have four cords on each side.
B) Take the innermost craft cord on each side and lay it on top of the other cords on the same side.
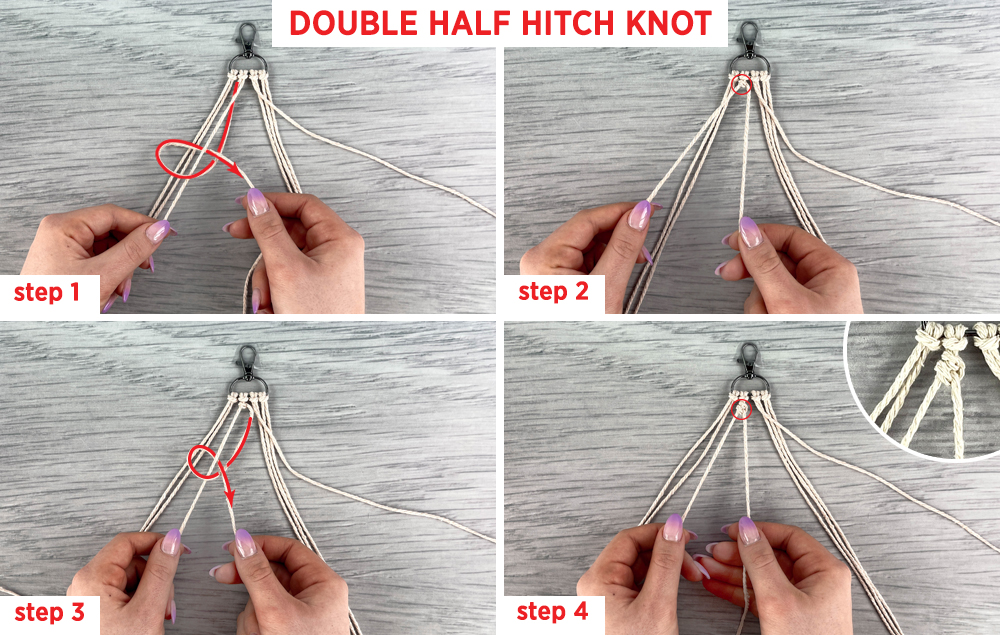
STEP 4:
A) Double half hitch knots will be used to create the pattern on the rest of the keychain. Starting on the left, hold the cord that you placed over the top of the others and pull it taut. This will be called the guide cord. Pick up the second cord on the left side and loop it over and under the guide cord as shown. The cord that is looped will be called the working cord.
B) Pull the working cord taut to slide the knot up to the top of the guide cord.
C) Continue to hold the guide cord taut on top of the other cords. Repeat the process by creating another loop and pulling it taut.
D) Slide the knot up to the top. You’ve now created a double half hitch knot.
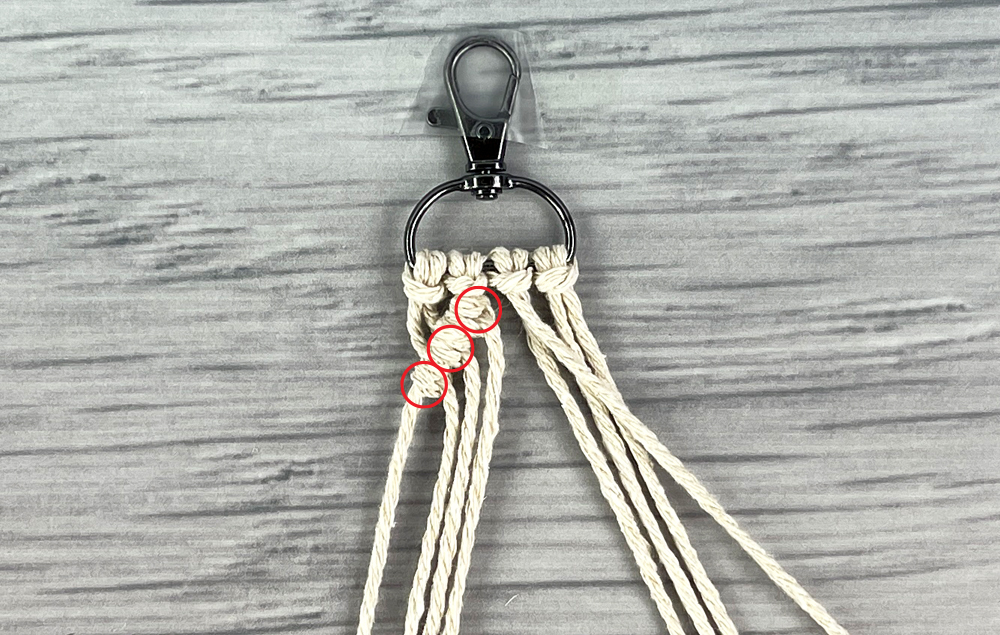
STEP 5:
A) Repeat steps 4A–4D on the next two cords, working right to left, to make two more double half hitch knots on the left side.
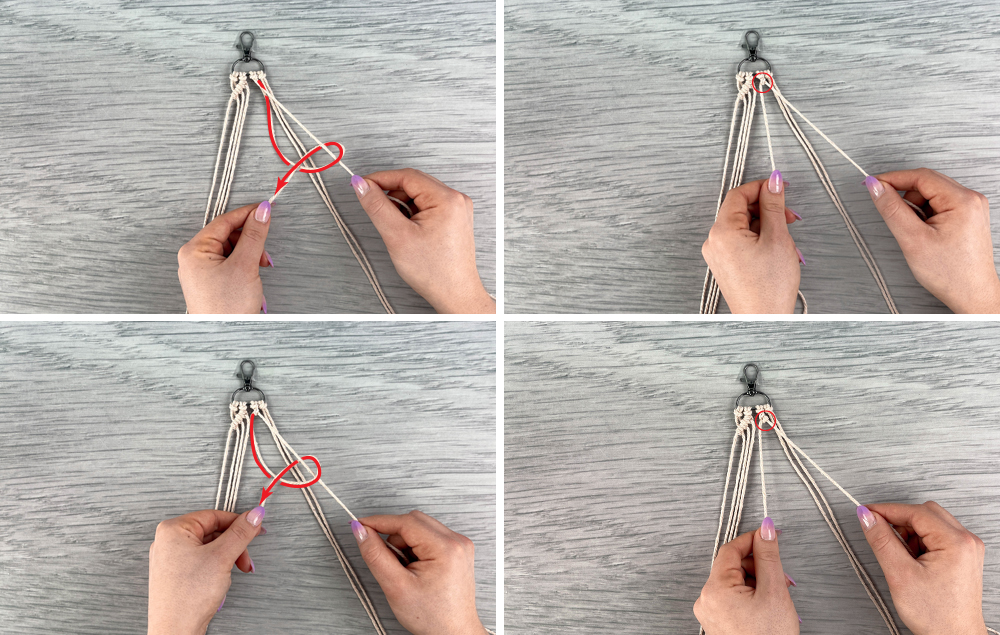
STEP 6:
A) On the right side, hold the guide cord taut. Pick up the second cord on the right side and use it as your working cord to make a loop over and under the guide cord as shown.
B) Pull the working cord taut to slide the knot up to the top of the guide cord.
C) Continue to hold the guide cord taut on top of the other cords. Repeat the process by creating another loop and pulling it taut.
D) Slide the knot up to the top.
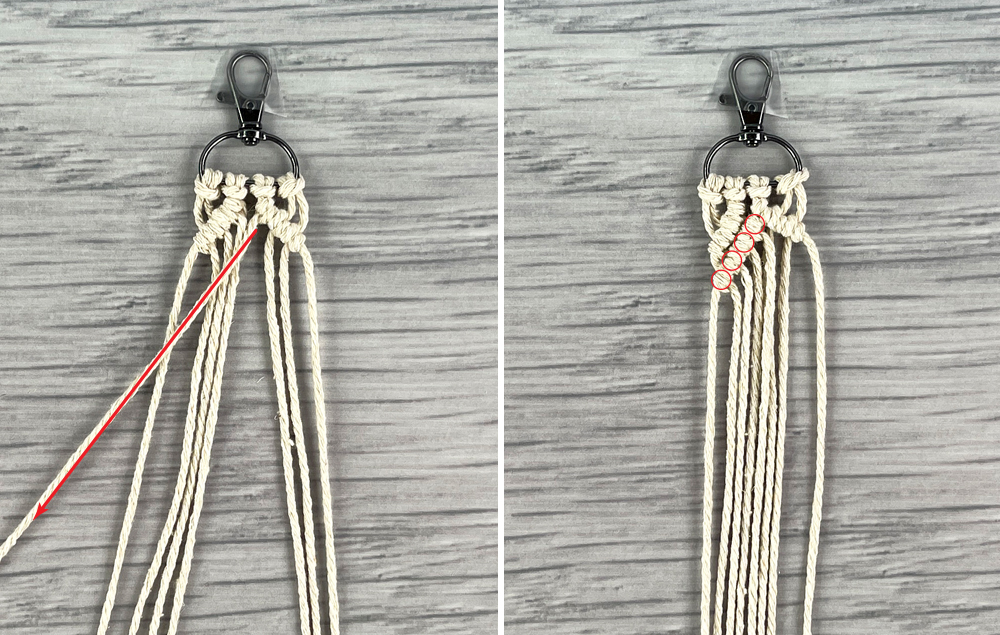
STEP 7:
A) Repeat steps 6A–6D on the next two cords, working left to right, to make two more double half hitch knots on the right side.
STEP 8:
A) Make a second row of double half hitch knots on the left side by holding the fifth cord from the left as your guide cord.
B) Use the four craft cords on the left as your working cords to make four knots. Pull taut so they are directly underneath the first row.
STEP 9:
A) Make a second row of double half hitch knots on the right side by holding the fourth cord from the right as your guide cord.
B) Use the three craft cords on the right as your working cords to make three knots. Pull taut so they are directly underneath the first row.
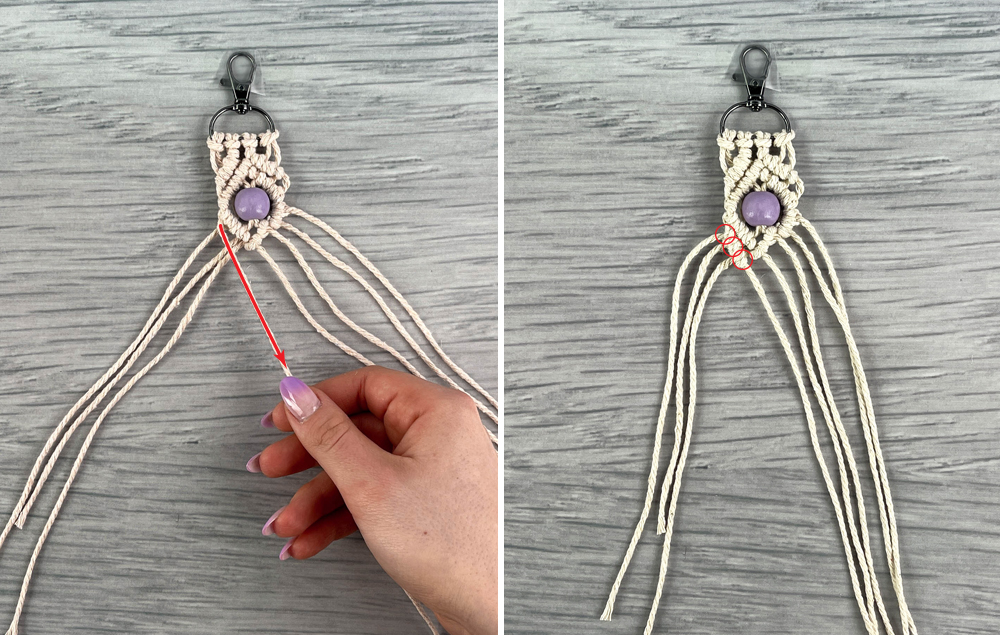
STEP 10:
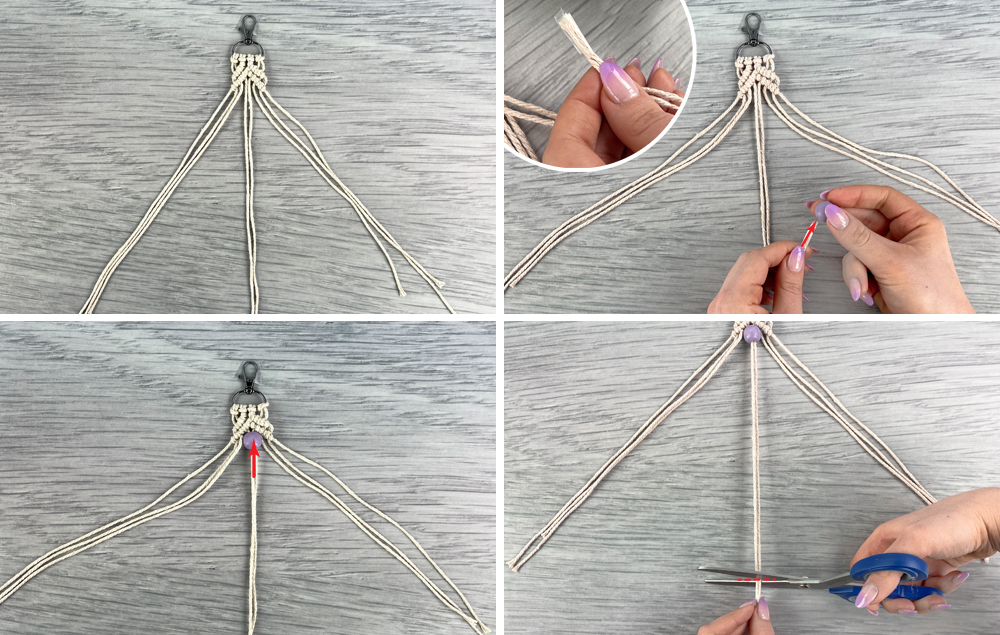
A) Separate the center two cords from the rest.
B) Wrap a piece of tape around the ends of the cords. Slide the cords through the hole in the wood bead.
C) Slide the wood bead up to the top.
D) Trim the tape off the ends of the cords.
STEP 11:
A) Begin the third row of double half hitch knots on the left side, working towards the center this time. Use the leftmost cord as the guide cord by pulling it taut over the top of the other cords. Pick up the second cord on the left side and loop it over and under the guide cord.
B) Pull the working cord taut to slide the knot up to the top of the guide cord.
C) Repeat the process by creating another loop and pulling it taut.
D) Slide the knot up to the top. Repeat to make two more knots.
STEP 12:
A) Begin the third row of double half hitch knots on the right side, working towards the center. Use the rightmost cord as the guide cord by pulling it taut over the top of the other cords. Pick up the second cord on the right side and loop it over and under the guide cord.
B) Pull the working cord taut to slide the knot up to the top of the guide cord.
C) Repeat the process by creating another loop and pulling it taut.
D) Slide the knot up to the top. Repeat to make three more knots.
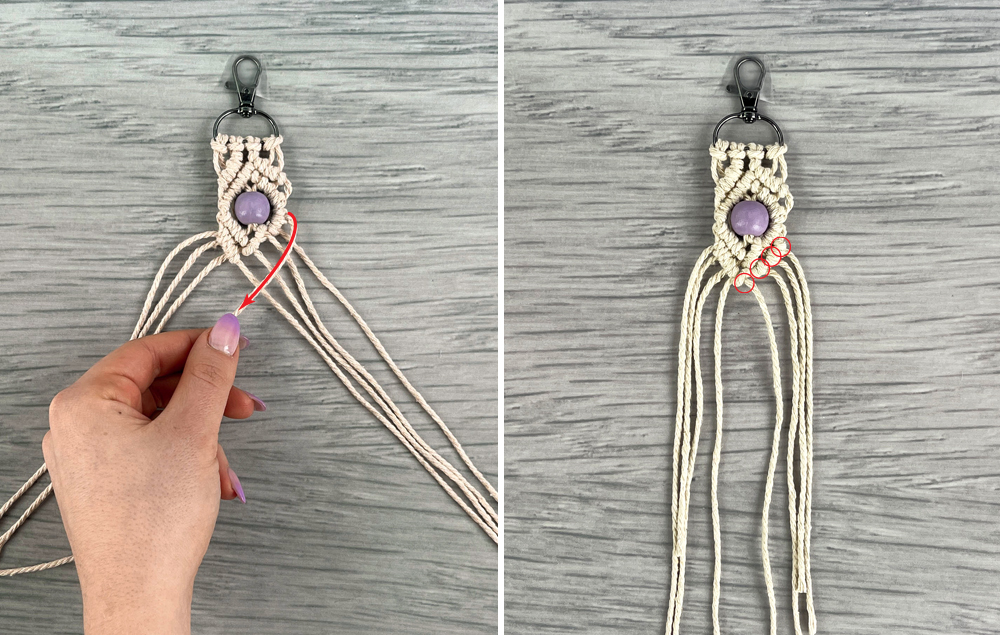
STEP 13:
A) Begin the fourth row of double half hitch knots on the left side. Use the leftmost cord as the guide cord by pulling it taught over the top of the other cords.
B) Make three knots on the left side.
STEP 14:
A) Begin the fourth row of double half hitch knots on the right side. Use the rightmost cord as the guide cord by pulling it taught over the top of the other cords.
B) Make four knots on the right side.
STEP 15:
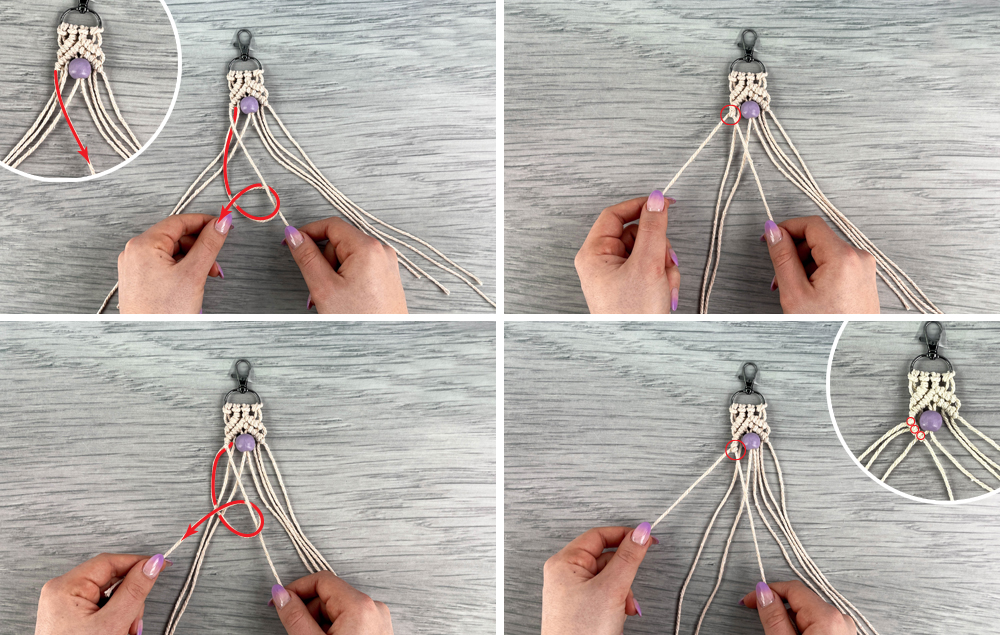
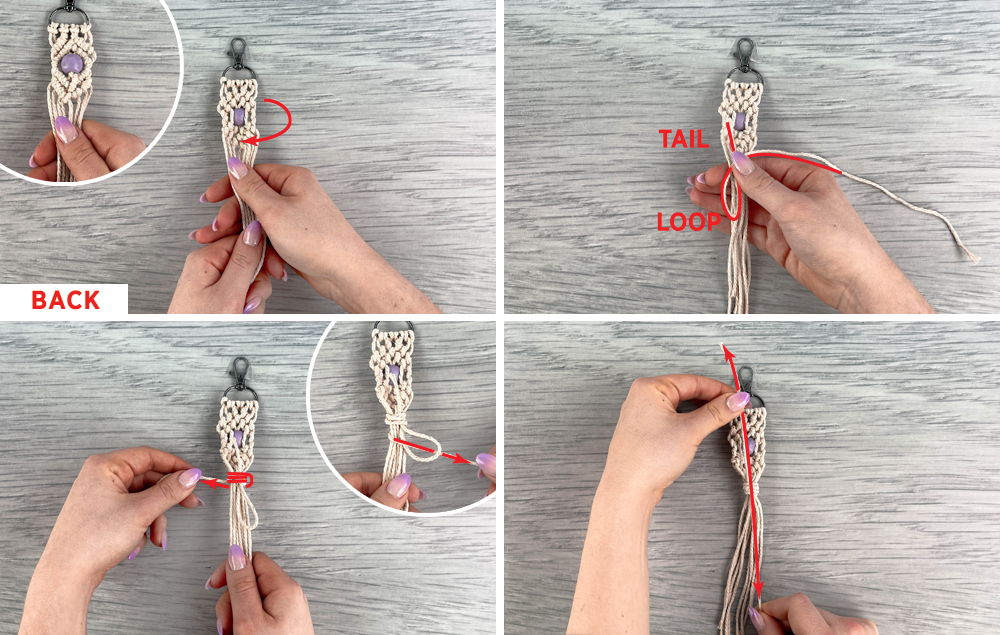
A) Gather the loose cords together. Flip the keychain over to the back side.
B) Pick up the 15" piece of craft cord. Create a loop, leaving a 2-inch “tail” sticking up towards the bead. Place the loop at the gathered junction of craft cords and pinch it in with the cords.
C) Wrap the long end of the 15" piece of cord around the gathered cords counterclockwise three times. Insert the end through the loop.
D) Pull the tail up and hold the long end taut to slide the knot tightly around the cords.
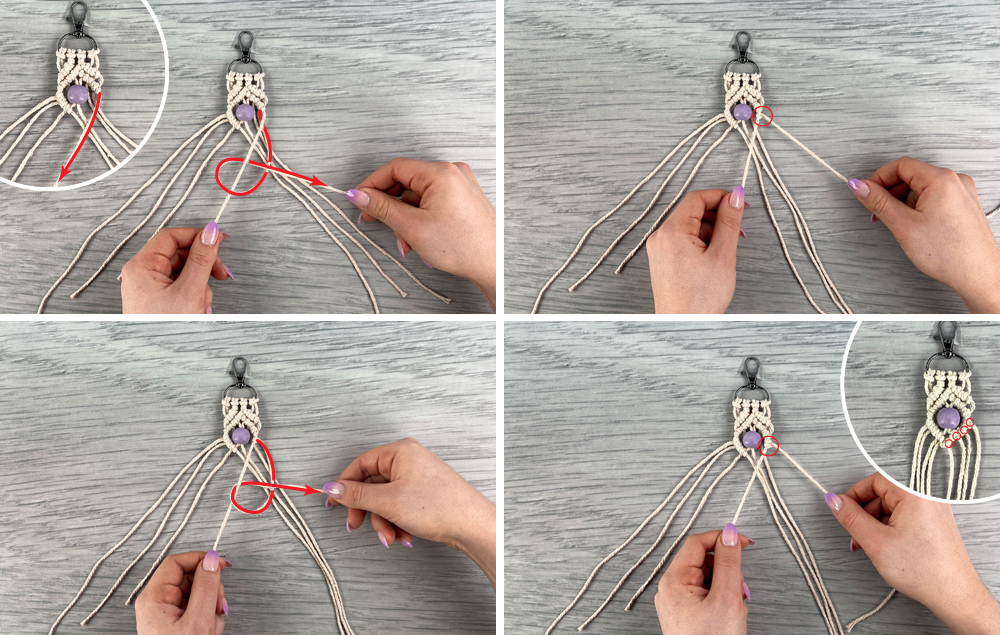
STEP 16:
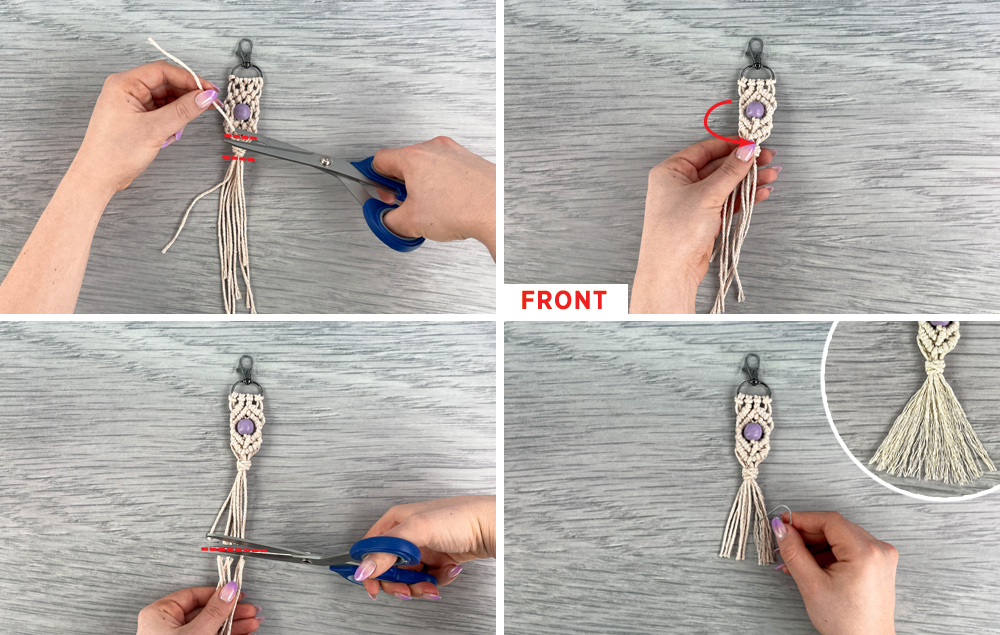
A) Trim off the tail and the long end of the 15" piece of cord.
B) Turn the keychain back around to the front.
C) Trim off the ends of the cords to your desired length.
D) Use a paper clip or wire brush to fray the ends of the cords.
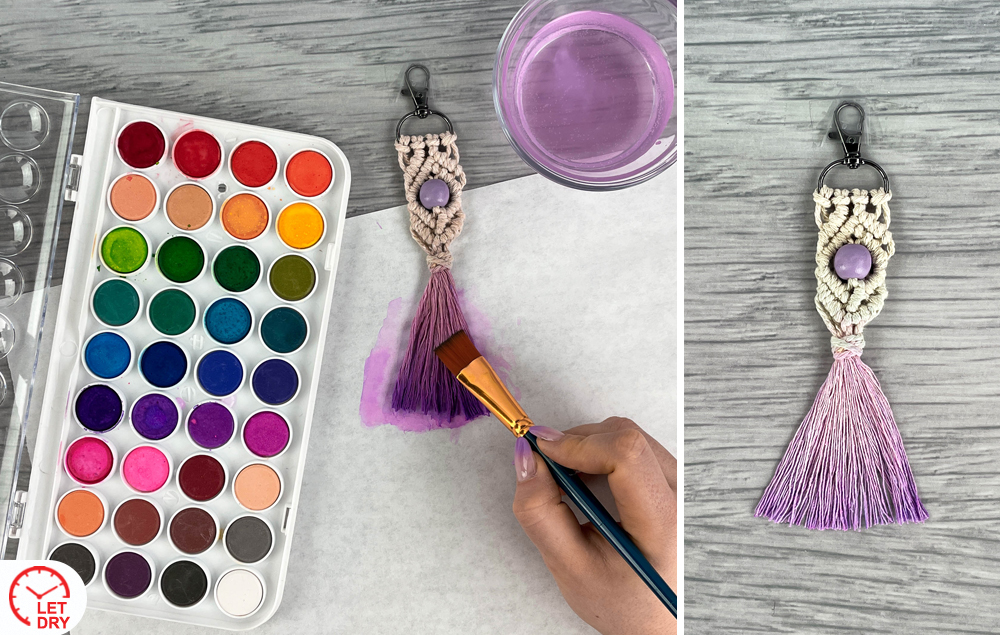
STEP 17:
A) Use watercolors to paint the ends of the cords. Tip: Apply more pigment towards the bottom for a gradient effect. Let dry.
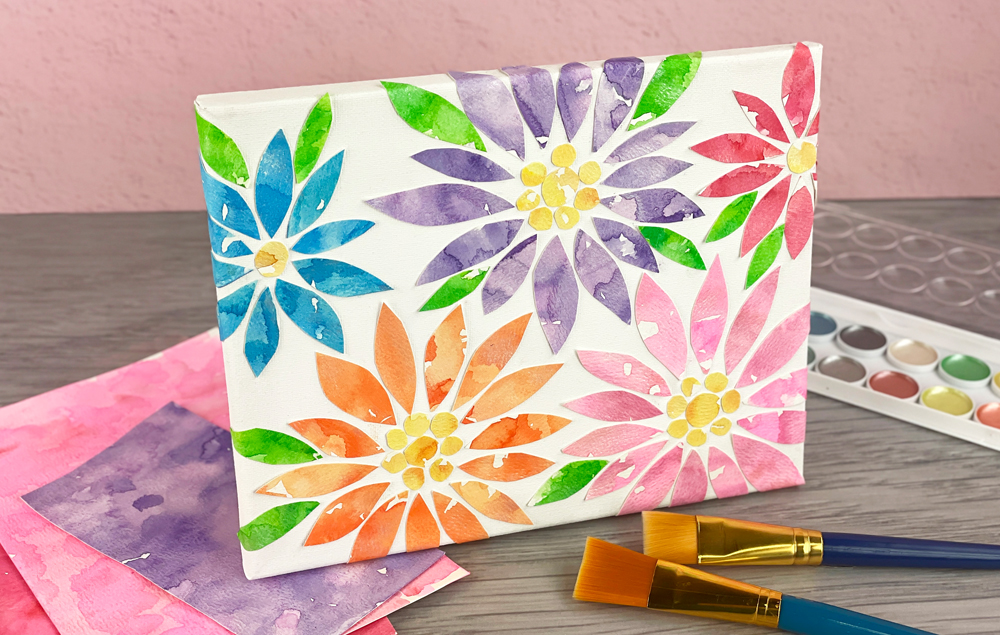
Transform watercolor paper into beautiful flower petals with this colorful collage art! Create a floral design on canvas — perfect for a Mother’s Day gift or a lovely addition to your home decor...
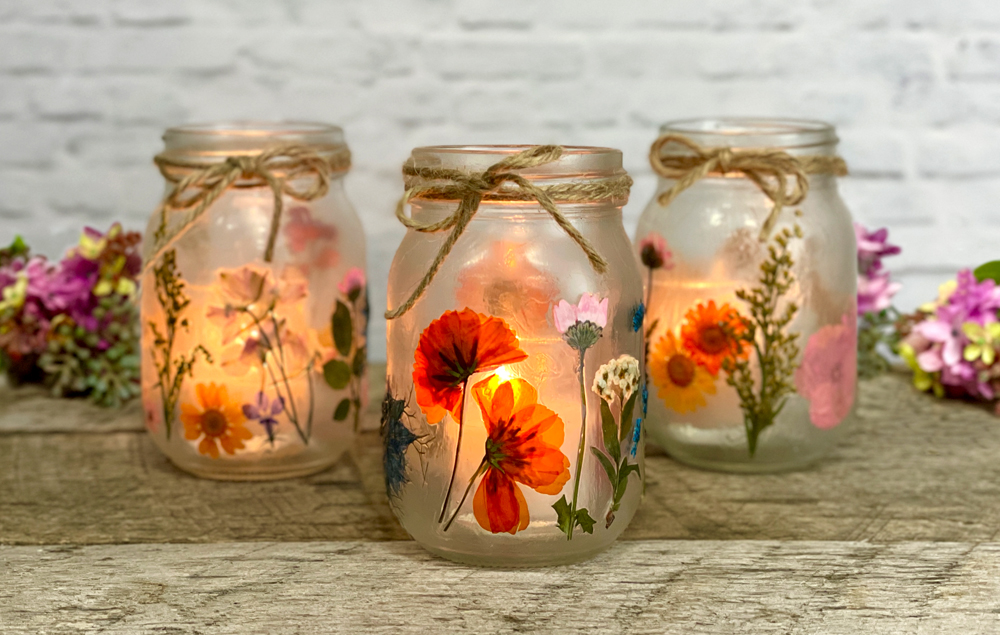
Making this pressed flower lantern is so simple, and the results are so beautiful! The flowers add a pop of color while the tea light provides a soft glow. This craft is great for a spring wedding or other special occasion...